Showing posts with label salesforce. Show all posts

Tuesday, 18 June 2019

Salesforce to Salesforce Integration

The Salesforce to Salesforce integration is very powerful to share the data's among the orgs.

In this post, we are using OAuth authorization type and connected app to connect the two different salesforce organizations. In this process, we are connecting two different developer orgs. If you are looking to connect sandboxes, you can replace the endpoint URL with the test.salesforce.com instead of login.salesforce.com.

Use Case: Fetch and display the contacts for the Account from another salesforce org.
Detailed Requirement: In an Org A, place a button on the Account detail page, when the user clicks on the button, retrieve and display the contacts available for the same account from another salesforce org B. It should look for the same Account Name to retrieve the contacts.

Step 1: Create a connected app in destination org(Salesforce org B from where you want to fetch data).


In the callback URL, replace the ap15 with your salesforce org instance.

Once saved, the Client Id and Client Secret will be generated. Copy these informations for later purpose.

Step 2: Create a @RestResource class to expose the data


@RestResource(urlMapping='/displayContacts/*')
global class ExposeContactsForAccountName {

    @HTTPGET
    global static List<Contact>  exposeContacts(){
        List<Contact> conList = new List<Contact>();
        
        RestRequest reqRequest = RestContext.request;
        RestResponse resResponse = RestContext.response;
        
        //Get the Account Name from the URL
        //urlDecode to remove get the exact Account Name from the URL
        string getAccName =  EncodingUtil.urlDecode(reqRequest.requestURI.substringAfterLast('/'), 'UTF-8');
        
        //Query the Contacts for the Account name and return the list
        conList = [Select id, Name, FirstName, LastName, Email, Phone from Contact where Account.Name =: getAccName];
        return conList;
    }
}

Step 3: Create a custom button in the source org (Salesforce org A where you want to display the contacts).


Once created, place this button on the page layout.


Step 4: In the source org(Salesforce org A where you want to display the contacts on button click), create custom settings to store the callout parameters like endpoint URL, Username, Password, Client Id, Client Secret and any other hardcode values.

Create "Hierarchy" type custom settings and necessary fields.

Once completed, click on Manage to store the values.

End Point URL: https://login.salesforce.com/services/oauth2/token  (it should be 'https://test.salesforce.com/services/oauth2/token' in case of sandbox)
Username: The destination org (Org B) username
Password: The destination org (Org B) password
Client Id: Paste the client id of the connected app (Org B)
Client Secret: Paste the client secret of the connected app (Org B)

Step 5: Create a visulaforce page in the source org (Org A). Give name as "DisplayContactsFromConnected" and past the below code.

<apex:page extensions="DisplayContactsFromConnectedOrgCont" sidebar="false" showHeader="false" standardController="Account">
    <apex:slds >
        <apex:form >
            <apex:pageMessages ></apex:pageMessages>
            <apex:pageBlock >
                <apex:pageBlockButtons
location="top" >
                    <div
style="float:right;">
                        <apex:commandButton
value="Create Contacts" title="Create Contacts" oncomplete="self.close();" action="{!insertSelectedContacts}"/>
                        <apex:commandButton
value="Cancel" title="Cancel" onclick="self.close();" />
                    </div>
                </apex:pageBlockButtons>
             
                <apex:pageBlockTable
value="{!conWrapper}" var="con">
                    <apex:column
headerValue="Select">
                        <center><apex:inputCheckbox
value="{!con.selectToInsert}"  /></center>
                    </apex:column>
                    <apex:column
headerValue="First Namevalue="{!con.FirstName}"/>
                    <apex:column 
headerValue="Last Namevalue="{!con.LastName}"/>
                    <apex:column 
headerValue="Emailvalue="{!con.Email}"/>
                    <apex:column 
headerValue="Phone Numbervalue="{!con.Phone}"/>
                </apex:pageBlockTable>
             
            </apex:pageBlock>
        </apex:form>
    </apex:slds>
</apex:page>


Step 6: Create an apex class "DisplayContactsFromConnectedOrgCont".

This class will get the current page id and retrieve the account name. Once account name received, do the callout to destination salesforce org and fetch the contacts list.

public with sharing class DisplayContactsFromConnectedOrgCont {

    Public ID accountID {get;set;} //to store the account id
    Public Account acc {get;set;} //to store the account details
    Public ApexPages.StandardController accountController;
    public string endPointURL; //to store the endpointurl
    public string clientID; //to store the client id
    public string clientSecretKey; //to store the client secret key
    public string userName; //to store the username
    public string password; //to store the password
    public string access_token; //to store the access token
    public List<contactsWrapper> conWrapper {get;set;} //wrapper class list
 
    public DisplayContactsFromConnectedOrgCont(ApexPages.StandardController controller){
     
        //save the values from custom settings
        endPointURL = SFToSF__c.getInstance().End_Point_URL__c;
        clientID = SFToSF__c.getInstance().Client_Id__c;
        clientSecretKey = SFToSF__c.getInstance().Client_Secret__c;
        userName = SFToSF__c.getInstance().Username__c;
        password = SFToSF__c.getInstance().Password__c;
     
     
        accountID = ApexPages.currentPage().getParameters().get('id'); //store the current page id (Account id)
        this.acc = (Account)controller.getRecord();
        this.accountController = controller;
        conWrapper = new List<contactsWrapper>(); //initialize the wrapper class list
        Account accRec = [Select id, Name from Account where ID =: accountID]; //Query to get the Account Nae
        //do the callout and fetch the contacts from another org and load into the wrapper class list to display
        fetchContacts(accRec.Name);
    }
 
    public void fetchContacts(string AccountName){
        //Login into the destination salesforce org
        Login();
        //Once access token is recieved, call the rest api and fetch the contact details
        if(access_token != null){
            Http ht = new Http();
            HttpRequest httpReq = new HttpRequest();
            //urlEncode the Account name to send in url format. For ex: If Account Name is "Test Account", it should send as "Test+Account"
            httpReq.setEndpoint('https://ap15.salesforce.com/services/apexrest/displayContacts/'+EncodingUtil.urlEncode(AccountName, 'UTF-8'));
            httpReq.setMethod('GET');
            httpReq.setHeader('Authorization', 'Bearer '+access_token);
            httpReq.setHeader('Content-Type', 'application/json');
            httpReq.setHeader('Accept', 'application/json');
            HttpResponse httpRes = ht.send(httpReq);
            //If callout is success, then deserialize the recieved JSON data with the Wrapper Class variables
            if(httpRes.getStatusCode() == 200){
                conWrapper = (List<contactsWrapper>)JSON.deserialize(httpRes.getBody(), List<contactsWrapper>.class);
            }
        }
    }
 
    //Login and get the access token
    public void Login(){
     
        string reqBody = 'grant_type=password&client_id='+clientID+'&client_secret='+clientSecretKey+'&username='+username+'&password='+password;
        Http ht = new Http();
        HttpRequest httpReq = new HttpRequest();
        httpReq.setEndpoint(endPointURL);
        httpReq.setMethod('POST');
        httpReq.setBody(reqBody);
        HttpResponse httpRes = ht.send(httpReq);
     
        if(httpRes.getStatusCode() == 200){
            string responseBody = httpRes.getBody();
            LoginWrapper logWrap = (LoginWrapper)JSON.deserialize(responseBody, LoginWrapper.class);
            access_token = logWrap.access_token;
        }
    }
    //Insert the selected contacts into the source org under the Same Account
    Public void insertSelectedContacts(){
       List<Contact> conList = new List<Contact>();
        for(contactsWrapper cow : conWrapper){
            if(cow.selectToInsert == true){
                Contact con = new Contact();
                con.FirstName = cow.FirstName;
                con.LastName = cow.LastName;
                con.Email = cow.Email;
                con.Phone = cow.Phone;
                con.Description = 'Added from another salesforce org';
                con.AccountId = accountID;
                conList.add(con);
            }
        }
        if(!conlist.isEmpty()){
            insert conlist;
        }
    }
 
    //Wrapper class to store the access token
    Public class LoginWrapper{
        public string access_token;
    }
    //Wrapper class to store the contacts informations
    Public class contactsWrapper{
        Public boolean selectToInsert {get;set;}
        Public string FirstName {get;set;}
        Public string LastName {get;set;}
        Public string Email {get;set;}
        public string Phone {get;set;}
    }
}


We are done!. Now, go to any Account detail page and click on Display Contacts from Connected Org.


One more feature!. Select the contacts and click on Create Contacts button to insert the selected contacts under this account 💪

Comments are welcome 😉


Friday, 9 September 2016

Concatenate Checkbox Fields Label In Formula Field In Salesforce

      Hi folks. Feeling good to back and write something useful. So today am gonna write about formula field effects.
Scenario : I have checkbox fields for sunday, monday, tuesday, wednesday, thursday, friday and saturday. I want to show only days that are true with comma separated strings. Below picture depicts the checkboxes.
Salesforce Checkbox field
Checkboxes

I've checked Monday and Thursday checkboxes. So output should be Moday, Thursday. 

Go to fields -> Create new fields -> Formula Field. I'm gonna call it as "True Days"

So do the formula now to bind only true days,

True_Days__c =

IF(Sunday__c, 'Sunday' & IF( 
OR(Monday__c, Tuesday__c, Wednesday__c, Thursday__c, Friday__c, Saturday__c), ',', '' 
), '') & 
IF(Monday__c, 'Monday' & IF( 
OR(Tuesday__c, Wednesday__c, Thursday__c, Friday__c, Saturday__c), ',', '' 
), '') & 
IF(Tuesday__c, 'Tuesday' & IF( 
OR(Wednesday__c, Thursday__c, Friday__c, Saturday__c), ',', '' 
), '') & 
IF(Wednesday__c, 'Wednesday' & IF( 
OR(Thursday__c, Friday__c, Saturday__c), ',', '' 
), '') & 
IF(Thursday__c, 'Thursday' & IF( 
OR(Friday__c, Saturday__c), ',', '' 
), '') & 
IF(Friday__c, 'Friday' & IF(Saturday__c, ',', ''), '') & 
IF(Saturday__c, 'Saturday', '')


From above formula field, we are just binding only the true values. Now save the field and see the formula field in detail page. Magic happened. It is not appending comma's before and after the strings.

formula field
Formula Field


put your thoughts in comments. Thanks!.

Tuesday, 2 February 2016

Convert Currency Into Words In Salesforce

                       Hi folks. Whenever we go to bank for deposit we have to fill the chellan with amount and address details. So there you can see the field called "Amount In Words". On the hand we can just write the amounts in words simply but how we can do it in salesforce object field?. So I come up with idea to implement this functionality in salesforce. To implement this functionality we need two things,

  1. Apex Class
  2. Apex Trigger
By using apex class and apex triggers we can achieve this functionality. Check the below image to see how it will give an output before implementing.

Currency Into Words in salesforce


Object            : Opportunity
Field               : Amount
Custom Field : Amount_in_Words__c (create this field before going coding)

So we are going to create an apex class and we will call this class into apex trigger.


  public with sharing class ConvertCurrencyToWords {
     
        static String[] to_19 = new string[]{ 'zero', 'One',  'Two', 'Three', 'Four',  'Five',  'Six', 'Seven',
                                              'Eight', 'Nine', 'Ten',  'Eleven', 'Twelve', 'Thirteen',  
                                              'Fourteen', 'Fifteen', 'Sixteen', 'Seventeen', 'Eighteen', 'Nineteen' };
        static String[] tens = new string[]{ 'Twenty', 'Thirty', 'Forty', 'Fifty', 'Sixty', 'Seventy', 'Eighty', 'Ninety'};
     
        static string[] denom = new string[]{ '',
                                             'Thousand',   'Million',     'Billion',    'trillion',    'quadrillion',  
                                             'quintillion', 's!xtillion',   'septillion',  'octillion',   'nonillion',  
                                             'decillion',  'undecillion',   'duodecillion', 'tredecillion',  'quattuordecillion',  
                                             's!xdecillion', 'septendecillion', 'octodecillion', 'novemdecillion', 'vigintillion' };
    // convert a value < 100 to English.  
   public static string convert_nn(integer val) {
             if (val < 20)
        return to_19[val];
      if (val == 100)
          return 'One Hundred';
      for (integer v = 0; v < tens.size(); v++) {
        String dcap = tens[v];
        integer dval = 20 + 10 * v;
        if (dval + 10 > val) {
          if (Math.Mod(val,10) != 0)
            return dcap + ' ' + to_19[Math.Mod(val,10)];
          return dcap;
        }    
      }
      return 'Should never get here, less than 100 failure';
    }
    // convert a value < 1000 to english, special cased because it is the level that kicks   
    // off the < 100 special case. The rest are more general. This also allows you to  
    // get strings in the form of "forty-five hundred" if called directly.  
    public static String convert_nnn(integer val) {
      string word = '';
      integer rem = val / 100;
      integer mod = Math.mod(val,100);
      if (rem > 0) {
        word = to_19[rem] + ' Hundred and';
        if (mod > 0) {
          word += ' ';
        }
      }
      if (mod > 0) {
        word += convert_nn(mod);
      }
      return word;
    }
    public static String english_number(long val) {
      if (val < 100) {
        return convert_nn(val.intValue());
      }
      if (val < 1000) {
        return convert_nnn(val.intValue());
      }
      for (integer v = 0; v < denom.size(); v++) {
        integer didx = v - 1;
        integer dval = (integer)Math.pow(1000, v);
        if (dval > val) {
          integer mod = (integer)Math.pow(1000, didx);
          integer l = (integer) val / mod;
          integer r = (integer) val - (l * mod);
          String ret = convert_nnn(l) + ' ' + denom[didx];
          if (r > 0) {
            ret += ', ' + english_number(r);
          }
          return ret;
        }
      }
      return 'Should never get here, bottomed out in english_number';
    }
  }


Trigger


trigger ConvertCurrencyToWords on Opportunity (before insert, before update) {

    for (Opportunity c : Trigger.new) {
        if (c.Amount != null && c.Amount >= 0) {
         
            Long n = c.Amount.longValue();
            string amo = ConvertCurrencyToWords.english_number(n);
            string amo1 = amo.remove(',');
            c.Amount_in_Words__c = amo1;
        } else {
            c.Amount_in_Words__c = null;
        }
    }
}


Now goto opportunity -> edit or create a record -> enter value for amount field->click on save->now you can see that amount in words at amount_in_words__c field.

Currency Into Words in salesforce

Hope it helps you. If you have any query comment below. Thanks!!.


Wednesday, 13 January 2016

Download JSZip.js, Filesaver.js, JQuery.js

          Sometimes JavaScript files are much important files in order to download anything from saleforce. I see many people searching for these files separately. So, I decided to give a download link for all of these important JavaScript files in one post.
You can find your needed file and download.

File 1: FileSaver.js  click here to Download
           
            FileSaver - This file is used to save the contents. Without saving to document or attachment                                    you can save the file to filesaver.js using saveAs() method.

File 2: JSZip.js   click here to Download

File 2: JQuery.js click here to Download

Friday, 8 January 2016

DETAIL PAGE BUTTON TO SHOW PDF FILE IN SALESFORCE

       
                    Salesforce is as easy as telling 1, 2, 3. Salesforce visualforce is allow us to create a PDF in simple keyword called renderAs
                    
HOW TO SHOW CUSTOM BUTTON THAT DISPLAYS PDF

                    Ok, lets start with creating your visualforce page that renderAs PDF and Add custom button to detail page of the object.

Am using INVOICE object  and the Api Name is Invoice__c.

1. Create Visualforce and name as InvoicePDF.vfp


     <apex:page standardController="Invoice__c"  showHeader="false" sidebar="false"                                 renderAs="PDF">

              //do what you want
              ...........
                         {!Invoice__c.Name}
              .............
             //do what you want

</apex:page>


renderAs="PDF" - This will render the visualforce page as PDF.

2. Add the Custom Button(Visualforce button named InvoicePDF.vfp) to Detail Page.(Optional)

     Goto,
  1. Invoice Object 
  2. Scroll down to Buttons, Links and Actions.
  3. Click new.
  4. Name the Button.
  5. Click on Detail Page Button.
  6. Select Visualforce Page from Dropdown. 
  7. Select InvoicePDF from the list.
  8. Click on Save and Add to PageLayout.


Recommanded : DOWNLOAD PDF'S AS ZIP FILE FROM LIST VIEW OF THE OBJECT


That's it you have done it. Hope it helps you. Thanks.

See you back. Happy Smile!!.

Wednesday, 16 December 2015

DYNAMIC APPROVAL PROCESS WITH PROCESS BUILDER IN SALESFORCE

               In Salesforce user can use Approval process to get approval from managers or higher authority. Approval processes route a record to one or more approvers, specifying the steps necessary for a record to be approved, and who must approve it at each step. In a normal approval process, i.e. Static approval process, the approvers at each step are explicitly specified in each step approval process or you can have the submitter choose the approver manually, as shown in the following screenshot
Static approval processSTATIC APPROVAL PROCESS

Whereas dynamic approval routing allows us to specify the approvers for each record using User lookup fields on the record requiring approval. These fields can be populated using the Process Builder or Apex, using data from a special custom object/setting that contains all the information needed to route the record. Dynamic approval routing provides the flexibility to route the approval request to different people based on Account Type or some other criteria related to the record. Let’s start with a business use case
Business Use case :- Steven Greene is working as System administrator in Universal ContainerHe has received a requirement from the management, to route opportunity approval requests to designated approvers, based on the opportunity’s Lead Source and the opportunity’s account type.
Solution of above business requirement
There are a few possible solutions for the above business scenario, but I’ll use Process Builder and Flow to solve the above business requirementSteps to create dynamic approval routing are mentioned below
  • Create a custom lookup (with user object) field on the object being approved
  • Create a custom settings/object that will be used as an approval matrix
  • Populate the approval matrix, i.e. create a few records in Custom settings/object
  • Use Flow and Process Builder to populate the lookup field on the record, from the approval matrix
  • Create or update an approval process to utilize the new lookup fields
Follow the below instructions to solve the above business requirement
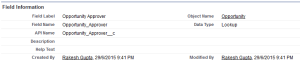
1. Create a custom lookup field on the Opportunity object, called as Opportunity Approver as shown in the following screenshot
Custom field
                                                                                                  CUSTOM FIELD

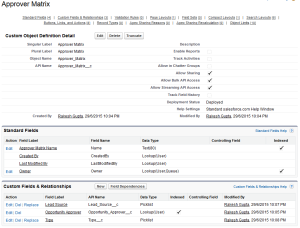
2. The next step is to create a custom object (Approver Matrixand few custom fields  to store all the fields used in routing, as shown in the following screenshot
Custom Object
                                                                                             CUSTOM OBJECT

3. The next step is to create the approval matrix records. For example Lead Source =Web and Type = Existing Customer – Upgrade, one might route the records to Helina Jolly as Opportunity Approver. It will loo like the following screenshot
Approver Matrix
                                                                                    APPROVER MATRIX

4. Now we will use Flow and Process Builder to populate the lookup fieldOpportunity Approver on the opportunity record, from the approval matrix.
Click on Name | Setup | App Setup | Create | Workflows & Approvals | Flows and then click on the New Flow, it will open the Flow canvas for you. Now create few Text variables VarT_LeadSource,  VarT_Type,  VarT_OpportuntiyApprover andVarT_OppId to store Lead source, Opportuntiy Type, opportunity Approver and Oportunity Id respectively.
5. The next step is to get the Opportunity approver, for this we will use record lookup element. To do this drag-and-drop Record Lookup element (Enter the name To get opportunity approver) onto the canvas and map the fields according to below details
  • Select Object Approver_Matrix__c
  • For criteria select Type__C{!VarT_Type} andLead_Source__C{!VarT_LeadSource}.
  • Save the Opportunity approver in a Text variable as shown in the following screenshot
Record Lookup - To get Opportunity ApproverRECORD LOOKUP – TO GET OPPORTUNITY APPROVER

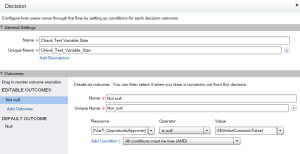
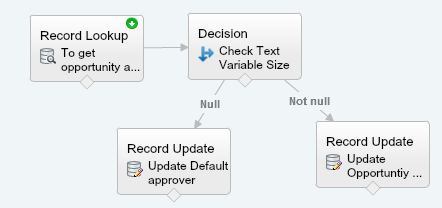
6. Now we will use the Decision element to check the Text Variable{!VarT_OpportuntiyApprover} size. If the Text Variable is not equal to null then we will go ahead and update Approver on opportunity record otherwise we will update it with a default approver. You can take help from the following  screenshot to create a Decision Element
Decision Element - Check Text Variable SizeDECISION ELEMENT – CHECK TEXT VARIABLE SIZE

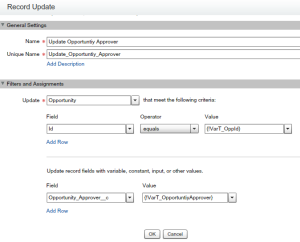
7. The next step is to update an Opportunity record. For this we will use Record Update element. Drag-and-drop Record Update element (Enter the name Update Opportuntiy Approver) onto the canvas and map the fields according to the following screenshot
Record Update - To update opportunity approverRECORD UPDATE – TO UPDATE OPPORTUNITY APPROVER

8. In case if there are no approver exist in Approver Matrix for current opportunity based on Type and Lead Source then we will update, Opportunity Approver with a default user Id. For this we will use Record Update element. Drag-and-drop Record Update element (Enter the name Update Default approver ) onto the canvas and map the fields according to the following screenshot
Record Update - To update default approverRECORD UPDATE – TO UPDATE DEFAULT APPROVER

Finally your Flow will look like the following screenshot
Dynamic Approval Routing
8Save your flow with name Dynamic Approval Routing and close the canvas. Don’t forget to Activate the Flow.
Launch a Flow from Process Builder
Our next task is to create a Process Builder on the Opportunity object to launch a Flow. To create a Process Builder on the Opportunity object follow the below instructions
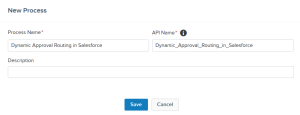
1. Click on Name | Setup | App Setup | Create | Workflows & Approvals | Process Builder  and click on the New button, Enter NameAPI Name and then click on theSave button
Define Process Properties
                                                                               DEFINE PROCESS PROPERTIES

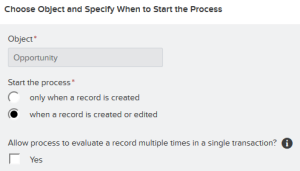
2. The next step is to add entry criteria. For this click on Add ObjectselectOpportunity object and for the entry criteria, Select when a record is created or edited, as shown in the below screenshot, once you are done click on the Save button
Record Evaluation Criteria
                                                                                  EVALUATION CRITERIA

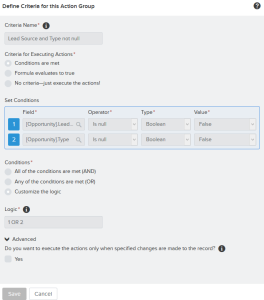
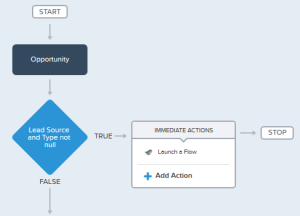
3. The next task is to add Process Criteria, To do this click on Add Criteria, enterNameType of action and set filter conditions (In this case set[Opportunity].LeadSource Is Null False or [Opportunity].Type Is Null False ) and click on the Save button as shown in the following screenshot
Process Criteria
                                                                                           PROCESS CRITERIA

4. The next step is to add an Immediate action to Process. Click on Add Action(Under Immediate actions), Select the type of action to create (In our case Flows), and then fill out the fields to define the action, as shown in the following screenshot
Add action – Flows
                                                                                  ADD ACTION – FLOWS

5. Once you are done, click on the Save button, it will redirect you to Process canvas. Finally the Process will look like the following screenshot
Dynamic Approval Routing in Salesforce
 Don’t forget to active the Process by clicking on the Activate button.
Modify the existing approval process
Final step is to modify the existing approval process. I assume that you have created an active approval process on Opportunity object, as shown in the following screenshot
Approval process on Opportunity
                                                                     APPROVAL PROCESS ON OPPORTUNITY

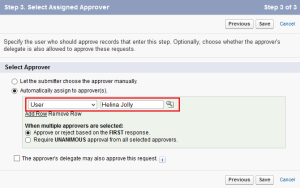
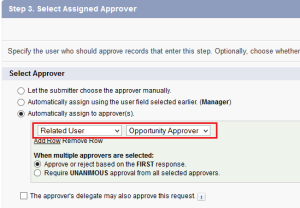
Now modify the approver step, and select related user Opportunity approver, as shown in the following screenshot
Select Assigned Approver
                                                                            SELECT ASSIGNED APPROVER

It’s time to test this feature
1) Navigate to the Opportunity tab, identify the Opportunity and click on Opportunity Name.
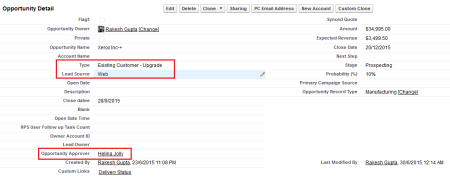
2) Update the Lead Source and Type, Process Builder automatically populate the Opportunity approver field, as shown in the following screenshot
Opportunity Record
                                                                                     OPPORTUNITY RECORD

3) Finally submit an Opportunity record for approval.
Approval Request
                                                                                      APPROVAL REQUEST

Note :-  I will suggest you to implement this first on your developer org, test it and then move it to production. Don’t try to implement this in Spring’15 org, otherwise you will get an error.