Wednesday, 23 December 2015

Useful Date Formula's In Salesforce Formula Field In Salesforce


                                Salesforce uses some out of box things to provide us better experience. So formula field is one of the very good concept comes from salesforce. Nowadays many small companies are depending on salesforce technology for their profit.
                                Date formulas are useful for managing payment deadlines, contract ages, or any other features of your organization that are time or date dependent. Two data types are used for working with dates, they are 


  1.  Date
  2.  Date/Time                                           
Some of the Date functions in formula are as follows

NameDescription
Today()Returns the current day, month, and year as a Date data type
Now()Returns the Date/Time value of the current moment
Date()Returns a Date value, given a year, month, and day. Numerical Y/M/D values and the YEAR(), MONTH(), and DAY() functions are valid parameters for DATE()
DateValue()DATEVALUE( date/time ) function to return the Date value of a Date/Time
DateTimeValue()Converts a Date value to a Date/Time

1. Exclude Weekends from Calculating Due Date

   Calculate Due Date from Start Date and Number Of Business Days
                        
                             Due Date = Start Date + Number of Days

  Number of Days should be excluded from Weekends(Saturdays and Sundays)

  Fields are,
                  Due_Date__c,
                  Start_Date__c, 
                  Number_of_Days__c.

                          Due_Date__c = Start_Date__c + Number_of_Days__c.

       so the logic for calculating Due_Date__c without weekends  is,

   Due_Date__c   =                    

          CASE( MOD(Start_Date__c - DATE(1900, 1, 7), 7), 0, (Start_Date__c) +  Number_of_Days__c + FLOOR((Number_of_Days__c-1)/5)*2, 1, (Start_Date__c) + 
 Number_of_Days__c + FLOOR((Number_of_Days__c)/5)*2, 2, (Start_Date__c) + 
 Number_of_Days__c + FLOOR((Number_of_Days__c+1)/5)*2, 3, (Start_Date__c) +  Number_of_Days__c + FLOOR((Number_of_Days__c+2)/5)*2, 4, (Start_Date__c) +  Number_of_Days__c + FLOOR((Number_of_Days__c+3)/5)*2, 5, (Start_Date__c) +  Number_of_Days__c + CEILING((Number_of_Days__c)/5)*2, 6, (Start_Date__c) -  IF(Number_of_Days__c>0,1,0) + Number_of_Days__c + CEILING((Number_of_Days__c)/5)*2, null)


2. Calculate Age from Date of Birth

    Fields are,
                    Date_of_Birth__c


Way 1 : IF(MONTH(TODAY())>MONTH(Date_of_Birth__c),YEAR(TODAY())YEAR(Date_of_Birth__c),             IF(AND(MONTH(TODAY())=MONTH(Date_of_Birth__c),DAY(TODAY())>=DAY(Date_of_Birth__c)),         YEAR(TODAY())-YEAR(Date_of_Birth__c),(YEAR(TODAY())-YEAR(Date_of_Birth__c))-1)) 

Way 2 : FLOOR((TODAY() - Date_of_Birth__c)/365.2425)

Way 3 : TEXT(YEAR(TODAY() ) - YEAR( Date_of_Birth__c))


3. Display Weekend Date from Given Date
     
      Calculate the weekend date from given date
      if Given date is,                   Date__c = 12/23/2015  (Wednesday)
      then weekend should be,     Weekend__c = 12/26/2015 (saturday is the weekend starting day)

      so Weekend__c =


 CASE(
 MOD(field A- DATE(1900, 1, 6),7),
  0, field A + 7,
  1, field A + 6,
  2, field A + 5,
  3, field A + 4,
  4, field A + 3,
  5, field A + 2, 
  6, field A + 1, 
  NULL )


NoteNote that if a record is created on a Saturday, this will calculate the following Saturday. If you'd like to change that and return the same date you can just remove the '+7' from the first statement.

4. Formate a Day as 23rd December 2015 from 12/23/2015
 
                 Convert date format mm/dd/yyyy to dd(postfix) month year

    Fields are,
                     Date_of_Birth__c = 12/23/2015

    so, result would be,
                     Converted format = 23rd December 2015

    Converted_format__c =


 IF( 
 ISBLANK( Date_Of_Birth__c ),
 NULL, (
 TEXT(DAY(Date_Of_Birth__c ))& 
 CASE( DAY(Date_Of_Birth__c ),
 1, 'st', 
 2, 'nd',
 3, 'rd',
 21,'st',
 22,'nd', 
 23,'rd', 
 31,'st', 
 'th' )&' '& 
 CASE( MONTH( Date_Of_Birth__c ),
 1, "January",
 2, "February",
 3, "March",
 4, "April",
 5, "May",
 6, "June",
 7, "July",
 8, "August",
 9, "September",
 10, "October",
 11, "November",
 "December" )&','& 
 TEXT(YEAR(Date_Of_Birth__c )) ) )


Hope these functions are helpful. Thanks!.
Wednesday, 16 December 2015

DYNAMIC APPROVAL PROCESS WITH PROCESS BUILDER IN SALESFORCE

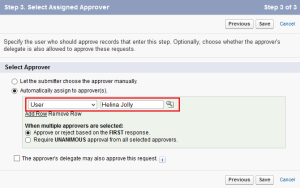
               In Salesforce user can use Approval process to get approval from managers or higher authority. Approval processes route a record to one or more approvers, specifying the steps necessary for a record to be approved, and who must approve it at each step. In a normal approval process, i.e. Static approval process, the approvers at each step are explicitly specified in each step approval process or you can have the submitter choose the approver manually, as shown in the following screenshot
Static approval processSTATIC APPROVAL PROCESS

Whereas dynamic approval routing allows us to specify the approvers for each record using User lookup fields on the record requiring approval. These fields can be populated using the Process Builder or Apex, using data from a special custom object/setting that contains all the information needed to route the record. Dynamic approval routing provides the flexibility to route the approval request to different people based on Account Type or some other criteria related to the record. Let’s start with a business use case
Business Use case :- Steven Greene is working as System administrator in Universal ContainerHe has received a requirement from the management, to route opportunity approval requests to designated approvers, based on the opportunity’s Lead Source and the opportunity’s account type.
Solution of above business requirement
There are a few possible solutions for the above business scenario, but I’ll use Process Builder and Flow to solve the above business requirementSteps to create dynamic approval routing are mentioned below
  • Create a custom lookup (with user object) field on the object being approved
  • Create a custom settings/object that will be used as an approval matrix
  • Populate the approval matrix, i.e. create a few records in Custom settings/object
  • Use Flow and Process Builder to populate the lookup field on the record, from the approval matrix
  • Create or update an approval process to utilize the new lookup fields
Follow the below instructions to solve the above business requirement
1. Create a custom lookup field on the Opportunity object, called as Opportunity Approver as shown in the following screenshot
Custom field
                                                                                                  CUSTOM FIELD

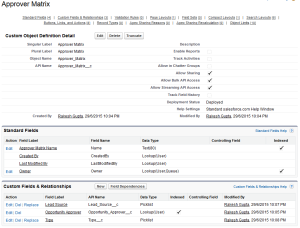
2. The next step is to create a custom object (Approver Matrixand few custom fields  to store all the fields used in routing, as shown in the following screenshot
Custom Object
                                                                                             CUSTOM OBJECT

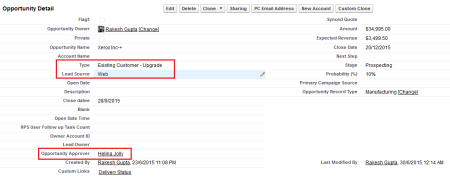
3. The next step is to create the approval matrix records. For example Lead Source =Web and Type = Existing Customer – Upgrade, one might route the records to Helina Jolly as Opportunity Approver. It will loo like the following screenshot
Approver Matrix
                                                                                    APPROVER MATRIX

4. Now we will use Flow and Process Builder to populate the lookup fieldOpportunity Approver on the opportunity record, from the approval matrix.
Click on Name | Setup | App Setup | Create | Workflows & Approvals | Flows and then click on the New Flow, it will open the Flow canvas for you. Now create few Text variables VarT_LeadSource,  VarT_Type,  VarT_OpportuntiyApprover andVarT_OppId to store Lead source, Opportuntiy Type, opportunity Approver and Oportunity Id respectively.
5. The next step is to get the Opportunity approver, for this we will use record lookup element. To do this drag-and-drop Record Lookup element (Enter the name To get opportunity approver) onto the canvas and map the fields according to below details
  • Select Object Approver_Matrix__c
  • For criteria select Type__C{!VarT_Type} andLead_Source__C{!VarT_LeadSource}.
  • Save the Opportunity approver in a Text variable as shown in the following screenshot
Record Lookup - To get Opportunity ApproverRECORD LOOKUP – TO GET OPPORTUNITY APPROVER

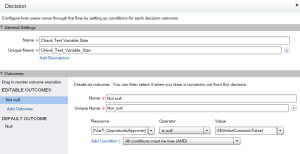
6. Now we will use the Decision element to check the Text Variable{!VarT_OpportuntiyApprover} size. If the Text Variable is not equal to null then we will go ahead and update Approver on opportunity record otherwise we will update it with a default approver. You can take help from the following  screenshot to create a Decision Element
Decision Element - Check Text Variable SizeDECISION ELEMENT – CHECK TEXT VARIABLE SIZE

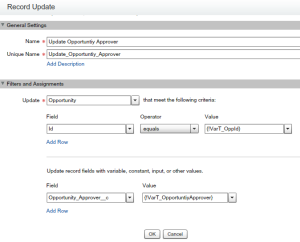
7. The next step is to update an Opportunity record. For this we will use Record Update element. Drag-and-drop Record Update element (Enter the name Update Opportuntiy Approver) onto the canvas and map the fields according to the following screenshot
Record Update - To update opportunity approverRECORD UPDATE – TO UPDATE OPPORTUNITY APPROVER

8. In case if there are no approver exist in Approver Matrix for current opportunity based on Type and Lead Source then we will update, Opportunity Approver with a default user Id. For this we will use Record Update element. Drag-and-drop Record Update element (Enter the name Update Default approver ) onto the canvas and map the fields according to the following screenshot
Record Update - To update default approverRECORD UPDATE – TO UPDATE DEFAULT APPROVER

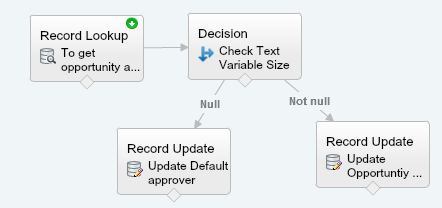
Finally your Flow will look like the following screenshot
Dynamic Approval Routing
8Save your flow with name Dynamic Approval Routing and close the canvas. Don’t forget to Activate the Flow.
Launch a Flow from Process Builder
Our next task is to create a Process Builder on the Opportunity object to launch a Flow. To create a Process Builder on the Opportunity object follow the below instructions
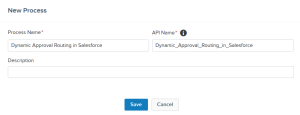
1. Click on Name | Setup | App Setup | Create | Workflows & Approvals | Process Builder  and click on the New button, Enter NameAPI Name and then click on theSave button
Define Process Properties
                                                                               DEFINE PROCESS PROPERTIES

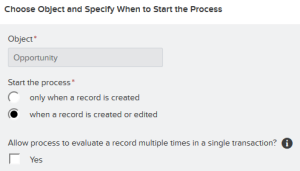
2. The next step is to add entry criteria. For this click on Add ObjectselectOpportunity object and for the entry criteria, Select when a record is created or edited, as shown in the below screenshot, once you are done click on the Save button
Record Evaluation Criteria
                                                                                  EVALUATION CRITERIA

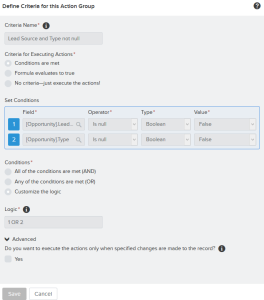
3. The next task is to add Process Criteria, To do this click on Add Criteria, enterNameType of action and set filter conditions (In this case set[Opportunity].LeadSource Is Null False or [Opportunity].Type Is Null False ) and click on the Save button as shown in the following screenshot
Process Criteria
                                                                                           PROCESS CRITERIA

4. The next step is to add an Immediate action to Process. Click on Add Action(Under Immediate actions), Select the type of action to create (In our case Flows), and then fill out the fields to define the action, as shown in the following screenshot
Add action – Flows
                                                                                  ADD ACTION – FLOWS

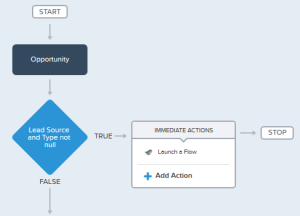
5. Once you are done, click on the Save button, it will redirect you to Process canvas. Finally the Process will look like the following screenshot
Dynamic Approval Routing in Salesforce
 Don’t forget to active the Process by clicking on the Activate button.
Modify the existing approval process
Final step is to modify the existing approval process. I assume that you have created an active approval process on Opportunity object, as shown in the following screenshot
Approval process on Opportunity
                                                                     APPROVAL PROCESS ON OPPORTUNITY

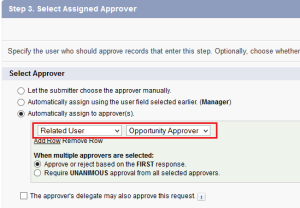
Now modify the approver step, and select related user Opportunity approver, as shown in the following screenshot
Select Assigned Approver
                                                                            SELECT ASSIGNED APPROVER

It’s time to test this feature
1) Navigate to the Opportunity tab, identify the Opportunity and click on Opportunity Name.
2) Update the Lead Source and Type, Process Builder automatically populate the Opportunity approver field, as shown in the following screenshot
Opportunity Record
                                                                                     OPPORTUNITY RECORD

3) Finally submit an Opportunity record for approval.
Approval Request
                                                                                      APPROVAL REQUEST

Note :-  I will suggest you to implement this first on your developer org, test it and then move it to production. Don’t try to implement this in Spring’15 org, otherwise you will get an error.